How to add Demo and Download Button in Blogger Post

How to add Demo and Download Button in Blogger Post

Most times the need to add demo or download button to your blog post may arise. Especially in times of sharing a software or a blog template with your cherished readers. It is appropriate to have a download button which makes it easy for the readers to download whichever material you want being downloaded.
Today I’m going to show you how to add an eye catching demo and download button to your blogger post.

Demo and Download Button

Now here we go…
1. Go To Blogger Dashboard > Template > Edit HTML
2. Backup your template before editing.
3. Click the “Expand Widgets Template” box
4. Search for this, ]]> . before it paste the following CSS Code.

.button {
-moz-border-radius:5px 5px 5px 5px;
-webkit-border-radius:5px 5px 5px 5px;
border-radius:5px 5px 5px 5px;
-moz-box-shadow:0 1px 3px rgba(0, 0, 0, 0.25);
-webkit-box-shadow:0 1px 3px rgba(0, 0, 0, 0.25);
box-shadow:0 1px 3px rgba(0, 0, 0, 0.25);
background:url(“http://www.zurb.com/images/overlay-button.png”) repeat-x scroll 0 0 #222222;
border-bottom:1px solid rgba(0, 0, 0, 0.25);
color:#FFFFFF !important;
cursor:pointer;
font-weight:bold;
line-height:1;
overflow:visible;
font-size:17px;
padding:8px 19px 9px;
position:relative;
text-decoration:none;
text-shadow:0 -1px 1px rgba(0, 0, 0, 0.25);
width:auto;
}
.demobutton {
background-color:#999999;
text-align:center;
width:150px;
}
.demobutton:hover {
background-color:#00A0EE;
}
.downloadbutton {
background-color:#91BD09;
text-align:center;
width:150px;
}
.downloadbutton:hover {
background-color:#00AC00;
}
.button:hover {
-moz-box-shadow:0 1px 11px rgba(0, 0, 0, 0.45);
-webkit-box-shadow:0 1px 11px rgba(0, 0, 0, 0.45);
box-shadow:0 1px 11px rgba(0, 0, 0, 0.45);
}

5. Save your template.

Now whenever you want to add the demo or download button you only need to add the following code in the “EDIT HTML” section of your Blogger Editor

For DEMO Button

 YOUR DEMO LINK HERE” rel=”nofollow” style=”float: left;” target=”_blank”>Live Demo

For DOWNLOAD Button

YOUR DOWNLOAD LINK HERE” rel=”nofollow” style=”float: left;” target=”_blank”>Download

Replace YOUR LINK HERE with your DEMO or DOWNLOAD LINK , That’s all.

Cheers!!!

– See more at: http://www.talky-tech.com/2014/06/how-to-add-demo-and-download-button-in.html#sthash.qmYiCHjP.dpuf

Beautiful CSS Email Subscription Widget For Blogger/Blogspot

By 
http://www.facebook.com/plugins/like.php?app_id=&channel=http%3A%2F%2Fstatic.ak.facebook.com%2Fconnect%2Fxd_arbiter%2FDU1Ia251o0y.js%3Fversion%3D41%23cb%3Df3b2c7ecac%26domain%3Dwww.gobloggertricks.com%26origin%3Dhttp%253A%252F%252Fwww.gobloggertricks.com%252Ff153273a3c%26relation%3Dparent.parent&href=http%3A%2F%2Fwww.gobloggertricks.com%2F2014%2F07%2Fbeautiful-css-email-subscription-widget.html&layout=button_count&locale=en_US&sdk=joey&send=false&show_faces=false&width=450http://platform.twitter.com/widgets/tweet_button.67ae45a68af44ab435dd5797206058d3.en.html#_=1422600694131&count=horizontal&dnt=false&id=twitter-widget-0&lang=en&original_referer=http%3A%2F%2Fwww.gobloggertricks.com%2F2014%2F07%2Fbeautiful-css-email-subscription-widget.html&size=m&text=Beautiful%20CSS%20Email%20Subscription%20Widget%20for%20Blogger%2FBlogspot&url=http%3A%2F%2Fwww.gobloggertricks.com%2F2014%2F07%2Fbeautiful-css-email-subscription-widget.html

 
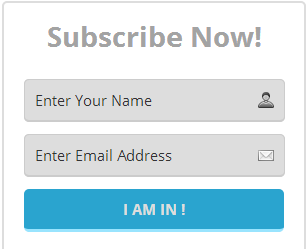
The Best Way to Reach your Audience is Making Email-Subsciption. You can Automatically Send All your Updates Via Email By Email Subscription Widget.Its Very Easy All you have to do is You have to Make the Visitors to Subscribe to your blog/website. You can make it Simple by Adding Beautiful Email-Subscription Widget on your blog/Website. Here is a Step to Add the Email Subscription widget for your blog/Website.

Step 1: Goto Blogger Dashboard
Step 2: Layout —> Add a Gadget —-> HTML/JavaScript.
Step 3: Copy and Paste the Below Code On HTML/JavaScript.
Code:


     #blogolect_Subscriber_name{
background: #ddd url(http://4.bp.blogspot.com/-25QiFr2GTeE/UuftiCdKHvI/AAAAAAAAD1M/0777CPDD-p4/s1600/name+icon.png) no-repeat center right;}
     #blogolect_Subscriber_email{
background: #ddd url(http://4.bp.blogspot.com/-s3Npo9Hn7Co/UuftiHPE5AI/AAAAAAAAD1I/HyfucVkukcY/s1600/email+icon.png) no-repeat center right;}
     #bgt-emailsubs {
      width: 300px;
      height: 265px;
      border: 2px solid #ddd;
      border-radius: 5px 5px 1px 1px;
     }
     #bgt-emailsubs .header {
     background: none ;
     color: #a3a3a3;
     font-size: 28px;
     line-height: 36px;
     padding: 15px 25px;
     font-weight: 700;
     font-family: open sans;
     text-align: center;

     }
   #bgt-emailsubs p {
    font-family: open sans;
    line-height: 26px;
    font-size: 13px;
    color:#333;
    padding: 10px 20px 0 20px;
    margin: 0;
   }
   #bgt-emailsubs .emailsub {
    padding: 0px 20px 10px 20px;
   }
   #bgt-emailsubs .emailsub .button {
    background: #2aa4cf;
    color: #ddd!important;
    font-weight: bold;
    margin-right: 5%;
    width: 100%;
    border:none;
    outline: none;
    border-bottom: 3px solid #99E4FE;
    transition:background .3s linear;
    cursor:pointer;
   }
   #bgt-emailsubs .emailsub input {
    color: #333;
    width: 92%;
    padding: 10px;
    margin-top: 10px;
    font-family: open sans;
    font-size: 15px;
    border: 1px solid #ccc;
    border-bottom: 2px solid #ccc;
    border-radius: 5px;
    transition:border 0.15s linear 0s, box-shadow 0.15s linear 0s, color 0.15s linear 0s;
   }
   #bgt-emailsubs .emailsub input:focus {
    outline: none;
    box-shadow: 0 0 3px 1px #2aa4cf;
   }
   #bgt-emailsubs .emailsub .button:hover{
background: #1D7290;
   }


            Subscribe Now!


            <form action='http://feedburner.google.com/fb/a/mailverify&#039; method='post'target="popupwindow" onsubmit="window.open('http://feedburner.google.com/fb/a/mailverify?uri=gobloggertricks‘, ‘popupwindow’, ‘scrollbars=yes,width=550,height=520’);return true”>


            <input type="hidden" value="gobloggertricks” name=”uri”/>


Step 4: Now Replace gobloggertricks With your Feedburner Username.

Step 5: Click “Save”.

Now You Are Done. Visit your Blog/Website to See your Email Subscription Widget.

If you Have Any Problem in Installing this Widget Please Comment Below or Contact Us at:contact@gobloggertricks.com .

Coca Cola style email subscription box widget for blogger above comments, Below is method for how to add This professional and beautiful gadget to blogger blog.

Coca Cola Email Subscription Box Widget For Blogger Above Comments
An email subscription box widget is the key of success in blogging era just like other widgets which helps you to achieve complete success in blogging. A complete success means awesome traffic, handsome money and loyal readers. The success of a blog is measured by its loyal readers which is indirectly a permanent traffic. A large group of people and readers who are interested in your blog and visit daily to your blog. But do you know how do you get such visitors or how to give them a chance to join your website or become a member of your blog so that when you publish a new post all of your readers will be informed and they will have access to visit your blog directly from their Inbox. To execute this you need an email subscription box widget. Here I will describe how to add an email subscription box widget for bloggers.

Best Position for email subscription box widget in blogger

There are various positions where you can add an email subscription box widget in blogger like in the sidebar, below the post title and above comments. So the best position from my point of view and my experience is above comment box because this is the position where your reader’s cursor will come when he finishes reading the article. It is very obvious that most of the people become member or subscribe to your blog when they find something unique in your blog. So our aim should be to increase the number of blogger subscribers because more subscriber means more page-views. So below is the best and simple code to add the email subscription box widget to blogger above comment box to increase your subscriber and loyal readers.

How to add the email subscription box widget to blogger above comment.

Go to blogger dashboard.
Click on template.
In new blogger template click on edit template
Now Hit format template.
Now Hit CTRL+F , A search box will appear.
Type ]]></b:skin> in search box.
And just above this code copy and paste the below code.
<b:if cond=’data:blog.pageType == &quot;item"’> #avdhootblogger{clear:both;background-image:url(‘http://3.bp.blogspot.com/-XojZlfFPHi8/UWW-jnmfb2I/AAAAAAAAAhk/l5NS3vO4QIA/s320/new+border.png&#8217;);color:#fff;display:block;position:relative;text-align:center;line-height:1.47}#avdhootblogger
h4{font-size:24px;border-bottom:1px solid #746E6E;padding:10px;letter-spacing:2px}#avdhootblogger input[type=&quot;email"],.sl_in_mail{margin-right:-6px;padding:16px
0 16px 40px;width:50%;border:none}#avdhootblogger
form{text-align:center;padding:20px
90px}#avdhootblogger input[type=submit]{border-radius:0;box-shadow:none;padding:18px
24px 16px;letter-spacing:2px;border:none;background:#E06;cursor:pointer;color:#FFF}#avdhootblogger
.counter{margin:0
0 25px}#avdhootblogger.efooter{background:none}#avdhootblogger.efooter
form{text-align:left;padding:0}#avdhootblogger.efooter input[type="submit"],#avdhootblogger.efooter input[type="email"],.wg_in_mail{padding:10px;letter-spacing:0px}#avdhootblogger.efooter.sidebar{background:#3C3C33;padding:20px}#avdhootblogger.efooter.sidebar
form{text-align:center}
Now it’s time to add this coca cola email subscription box widget to above comments so here is the HTML part.
Now again find this piece of code.
<div class=’post-footer-line post-footer-line-3′>
Now when you have found this one line piece of code , Copy the below code and paste it below the above one line code.
<div id=’avdhootblogger’><form action=’http://feedburner.google.com/fb/a/mailverify&#8217; method=’post’ onsubmit=’window.open(‘http://feedburner.google.com/fb/a/mailverify?uri=WidgetsForBloggerbloggerGadgetsbloggingTipsseoTipsbloggerWidget‘, &apos;popupwindow’, &apos;scrollbars=yes,width=550,height=520′);return true’ target=’popupwindow’>

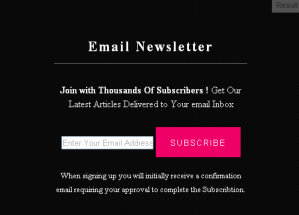
Email Newsletter

<div class=’counter’>Join with Thousands Of Subscribers ! </b> Get Our Latest Articles Delivered to Your email Inbox </div><input name='uri' type='hidden' value='WidgetsForBloggerbloggerGadgetsbloggingTipsseoTipsbloggerWidget‘/>

When signing up you will initially receive a confirmation email requiring your approval to complete the subscription.</small>

</div></b:if>

Customization

Insert your Feedburner id in highlighted red color.

I Hope you liked this coca cola email subscription box widget for blogger above comments, feel free to comment and share.

Add Multi Tabbed Navigation Widget in Blogger

Friends my tutorial that i share how to add multi tabbed widget in blogger by CSS jQuery. I believe you like this. In this tutorial which will guide you to add this widget to your blog’s sidebar.It looks very nice in your sidebar.Your blog looking good with these tabs and easy.This navigation tabs that allow us to group in a single container gadgets and these can be selected by tabs.Its main function is to save space on the blog to avoid scattered gadgets in the same category so you can group multiple gadgets into one. There are several methods for creating tab views, some require jQuery, other More Tools, or any other script.Any way now we explain the method that how you add in your Blogger…

How Add Tabbed Navigationin in Blogger

First Download a Backup of Your Template


  • Login to your blogger dashboard
  • Go to Templates. 
  • Click on Edit Templates
  • Press Ctrl+F and Find below code  ]]>
  • Just Above the ]]>  Paste the following Code


 /* Tabview for Blogger
———————————————– */
.tabviewcont{
margin:15px 0;
padding:0;
clear:both;
}

.tabviewnav {
margin: 0 0 0 14px;
padding:3px 0; /* If you are using a Blogger Template change 0 with 15px */
font-size:12px; /* Font size of text inside tabs */
font-weight:bold;
}
.tabviewnav li {
list-style:none;
margin:0;
display:inline;
}
.tabviewnav li a {
padding:3px 6px;
margin-right:1px;
background:#F6F6F6; /* The background color of the tabs */
border-radius:5px 5px 0 0;
-moz-border-radius:5px 5px 0 0; 
-webkit-border-radius:5px 5px 0 0; 
text-decoration:none;
color:#222222;
}
.tabviewnav li a:hover {
color:#222222;
background:#EBEBEB; /* Background color of the tab on mouseover */
text-decoration:none;
}
.tabviewnav li.tabviewactive a,
.tabviewnav li.tabviewactive a:hover {
background:#EBEBEB; /* Background color of the active tab */
color:#222222;
}
.tabviewcont .tabviewtab {
padding:5px;
border:1px solid #EEEEEE; /* Border around the container */
background:#fff; /* The background color of the gadget */
}
.tabviewcont .tabviewtab h2,
.tabviewcont .tabviewtabhide {
display:none;
}
.tabviewtab .widget-content ul{
list-style:none;
margin:0 0 10px 0;
padding:0;
}
.tabviewtab .widget-content li {
border-bottom:1px solid #ccc;
margin:0 5px;
padding:2px 0 5px 0;

}

  • Now Find the  tag and Paste the following Code Just above it…


// Tabview for grouping gadgets 

//<![CDATA[ 
document.write(‘.tabview{display:none;}’);function tabviewObj(argsObj){var arg;this.div=null;this.classMain=”tabview”;this.classMainLive=”tabviewcont”;this.classTab=”tabviewtab”;this.classTabDefault=”tabviewtabdefault”;this.classNav=”tabviewnav”;this.classTabHide=”tabviewtabhide”;this.classNavActive=”tabviewactive”;this.titleElements=[‘h2′,’h3′,’h4′,’h5′,’h6′];this.titleElementsStripHTML=true;this.removeTitle=true;this.addLinkId=false;this.linkIdFormat=’nav’;for(arg in argsObj){this[arg]=argsObj[arg]}this.REclassMain=new RegExp(‘\\b’+this.classMain+’\\b’,’gi’);this.REclassMainLive=new RegExp(‘\\b’+this.classMainLive+’\\b’,’gi’);this.REclassTab=new RegExp(‘\\b’+this.classTab+’\\b’,’gi’);this.REclassTabDefault=new RegExp(‘\\b’+this.classTabDefault+’\\b’,’gi’);this.REclassTabHide=new RegExp(‘\\b’+this.classTabHide+’\\b’,’gi’);this.tabs=new Array();if(this.div){this.init(this.div);this.div=null}}tabviewObj.prototype.init=function(e){var childNodes,i,i2,t,defaultTab=0,DOM_ul,DOM_li,DOM_a,aId,headingElement;if(!document.getElementsByTagName){return false}if(e.id){this.id=e.id}this.tabs.length=0;childNodes=e.childNodes;for(i=0;i<childNodes.length;i++){if(childNodes[i].className&&childNodes[i].className.match(this.REclassTab)){t=new Object();t.div=childNodes[i];this.tabs[this.tabs.length]=t;if(childNodes[i].className.match(this.REclassTabDefault)){defaultTab=this.tabs.length-1}}}DOM_ul=document.createElement("ul");DOM_ul.className=this.classNav;for(i=0;i<this.tabs.length;i++){t=this.tabs[i];t.headingText=t.div.title;if(this.removeTitle){t.div.title=''}if(!t.headingText){for(i2=0;i2<this.titleElements.length;i2++){headingElement=t.div.getElementsByTagName(this.titleElements[i2])[0];if(headingElement){t.headingText=headingElement.innerHTML;if(this.titleElementsStripHTML){t.headingText.replace(/
/gi,” “);t.headingText=t.headingText.replace(/]+>/g,””)}break}}}if(!t.headingText){t.headingText=i+1}DOM_li=document.createElement(“li”);t.li=DOM_li;DOM_a=document.createElement(“a”);DOM_a.appendChild(document.createTextNode(t.headingText));DOM_a.href=”javascript:void(null);”;DOM_a.title=t.headingText;DOM_a.onclick=this.navClick;DOM_a.tabview=this;DOM_a.tabviewIndex=i;if(this.addLinkId&&this.linkIdFormat){aId=this.linkIdFormat;aId=aId.replace(//gi,this.id);aId=aId.replace(//gi,i);aId=aId.replace(//gi,i+1);aId=aId.replace(//gi,t.headingText.replace(/[^a-zA-Z0-9\-]/gi,”));DOM_a.id=aId}DOM_li.appendChild(DOM_a);DOM_ul.appendChild(DOM_li)}e.insertBefore(DOM_ul,e.firstChild);e.className=e.className.replace(this.REclassMain,this.classMainLive);this.tabShow(defaultTab);if(typeof this.onLoad==’function’){this.onLoad({tabview:this})}return this};tabviewObj.prototype.navClick=function(event){var rVal,a,self,tabviewIndex,onClickArgs;a=this;if(!a.tabview){return false}self=a.tabview;tabviewIndex=a.tabviewIndex;a.blur();if(typeof self.onClick==’function’){onClickArgs={‘tabview’:self,’index’:tabviewIndex,’event’:event};if(!event){onClickArgs.event=window.event}rVal=self.onClick(onClickArgs);if(rVal===false){return false}}self.tabShow(tabviewIndex);return false};tabviewObj.prototype.tabHideAll=function(){var i;for(i=0;i<this.tabs.length;i++){this.tabHide(i)}};tabviewObj.prototype.tabHide=function(tabviewIndex){var div;if(!this.tabs[tabviewIndex]){return false}div=this.tabs[tabviewIndex].div;if(!div.className.match(this.REclassTabHide)){div.className+=' '+this.classTabHide}this.navClearActive(tabviewIndex);return this};tabviewObj.prototype.tabShow=function(tabviewIndex){var div;if(!this.tabs[tabviewIndex]){return false}this.tabHideAll();div=this.tabs[tabviewIndex].div;div.className=div.className.replace(this.REclassTabHide,'');this.navSetActive(tabviewIndex);if(typeof this.onTabDisplay=='function'){this.onTabDisplay({'tabview':this,'index':tabviewIndex})}return this};tabviewObj.prototype.navSetActive=function(tabviewIndex){this.tabs[tabviewIndex].li.className=this.classNavActive;return this};tabviewObj.prototype.navClearActive=function(tabviewIndex){this.tabs[tabviewIndex].li.className='';return this};function tabviewAutomatic(tabviewArgs){var tempObj,divs,i;if(!tabviewArgs){tabviewArgs={}}tempObj=new tabviewObj(tabviewArgs);divs=document.getElementsByTagName("div");for(i=0;i<divs.length;i++){if(divs[i].className&&divs[i].className.match(tempObj.REclassMain)){tabviewArgs.div=divs[i];divs[i].tabview=new tabviewObj(tabviewArgs)}}return this}function tabviewAutomaticOnLoad(tabviewArgs){var oldOnLoad;if(!tabviewArgs){tabviewArgs={}}oldOnLoad=window.onload;if(typeof window.onload!='function'){window.onload=function(){tabviewAutomatic(tabviewArgs)}}else{window.onload=function(){oldOnLoad();tabviewAutomatic(tabviewArgs)}}}if(typeof tabviewOptions=='undefined'){tabviewAutomaticOnLoad()}else{if(!tabviewOptions['manualStartup']){tabviewAutomaticOnLoad(tabviewOptions)}}

//]]> 


Option 1:

  • Now Find the below line in your template:


  • After find paste the following code just below it…


Option 2:

  • if you use an old template of Blogger then search this line


How Remove/ Rename Author Name in Blogger Blog

Hello friends in this tutorial you can remove and rename the author name very easily. I believe this will only select authors within blog posts (all blogs though) but not other places where an author’s name might appear.
If have many blogs and for some reason you don’t want to show your name in author field(post footer),then this Blogger hack is for you. Though the tutorial you can remove very easily, I will explain how to remove & rename the author name and link from default Blogger blogs.


How Remove,hide and Rename Author Name in Blogger Blog


How you Remove Author in Blog

First Download a Copy of Your Template

  • Login to your blogger dashboard
  • Go to Templates. 
  • Click on Edit Templates
  • Press Ctrl+F and Find below code


  • Remove this above code in your template
  • Save your template


Note: In your template you see many same code just remove one by one and preview your template which code is remove or hide your author name remove its one…

How you Rename Author in Blog


Same above method just  with your own name
like this:

POSTED BY,  you can now add/change what you want to display on the post here…


How you Rename Author Icon in Blog

Adult Content Warning and Porn Content Policy in Blogger 2015

An update on the Blogger porn content policy


This week, we announced a change to Blogger’s porn policy stating that blogs that distributed sexually explicit images or graphic nudity would be made private.

We’ve received lots of feedback about making a policy change that impacts longstanding blogs, and about the negative impact this could have on individuals who post sexually explicit content to express their identities.

We appreciate the feedback. Instead of making this change, we will be maintaining our Existing Policies.

What this means for blog owners

Commercial porn will continue to be prohibited.
If you have pornographic or sexually explicit content on your blog, you must Turn on the adult content setting so a warning will show. If a blog with adult content is brought to Google’s attention and the content warning is not active, we will turn on the warning interstitial for you. If this happens repeatedly, the blog may be removed.
If you don’t have sexually explicit content on your blog and you’re following the rest of the Blogger Content Policy, you don’t need to make any changes to your blog.

Blogger Content Policy

(Existing Policies)

Blogger is a free service for communication, self-expression and freedom of speech. We believe Blogger increases the availability of information, encourages healthy debate, and makes possible new connections between people. It is our belief that censoring this content is contrary to a service that bases itself on freedom of expression.

However, in order to uphold these values, we need to curb abuses that threaten our ability to provide this service and the freedom of expression it encourages. As a result, there are some boundaries on the type of content that can be hosted with Blogger. The boundaries we’ve defined are those that both comply with legal requirements and that serve to enhance the service as a whole.

If you encounter a blog that you believe violates our policies, please report it to us using the ‘Report Abuse’ link located at the top of each blog under the ‘More’ dropdown. If the blog owner has hidden this link, you can still report abuse in the Blogger Help Center.

Content Boundaries


Our content policies play an important role in maintaining a positive experience for you, the users. Please respect these guidelines. From time to time, we may change our content policies so please check back here. Also, please note that when applying the policies below, we may make exceptions based on artistic, educational, documentary, or scientific considerations or where there are other substantial benefits to the public from not taking action on the content.

Adult Content: We do allow adult content on Blogger, including images or videos that contain nudity or sexual activity. If your blog contains adult content, please mark it as ‘adult’ in your Blogger settings. We may also mark blogs with adult content where the owners have not. All blogs marked as ‘adult’ will be placed behind an ‘adult content’ warning interstitial. If your blog has a warning interstitial, please do not attempt to circumvent or disable the interstitial – it is for everyone’s protection.

There are some exceptions to our adult content policy:

  • Do not use Blogger as a way to make money on adult content. For example, don’t create blogs that contain ads for or links to commercial porn sites.
  • We do not allow illegal sexual content, including image, video or textual content that depicts or encourages rape, incest, bestiality, or necrophilia.
  • Do not post or distribute private nude or sexually explicit images or videos without the subject’s consent. If someone has posted a private nude or sexually explicit image or video of you, please report it to us here.


Child safety: We have a zero-tolerance policy towards content that exploits children. Some examples of this include:

  • Child sexual abuse imagery: We will terminate the accounts of any user we find publishing or distributing child sexual abuse imagery. We will also report that user to law enforcement.
  • Pedophilia: We do not allow content that encourages or promotes sexual attraction towards children. For example, do not create blogs with galleries of images of children where the collection of images or text accompanying the images is sexually suggestive, and do not publish content of a sexual nature involving an underage participant.

Hate Speech: Our products are platforms for free expression. But we don’t support content that promotes or condones violence against individuals or groups based on race or ethnic origin, religion, disability, gender, age, nationality, veteran status, or sexual orientation/gender identity, or whose primary purpose is inciting hatred on the basis of these core characteristics. This can be a delicate balancing act, but if the primary purpose is to attack a protected group, the content crosses the line.

Crude Content: Don’t post content just to be shocking or graphic. For example, collections of close-up images of gunshot wounds or accident scenes without additional context or commentary would violate this policy.

Violence: Don’t threaten other people on your blog. For example, don’t post death threats against another person or group of people and don’t post content encouraging your readers to take violent action against another person or group of people.

Harassment: Do not harass or bully others. Anyone using Blogger to harass or bully may have the offending content removed or be permanently banned from the site. Online harassment is also illegal in many places and can have serious offline consequences.

Copyright: It is our policy to respond to clear notices of alleged copyright infringement. More information about our copyright procedures can be found here. Also, please don’t provide links to sites where your readers can obtain unauthorized downloads of other people’s content.

Personal and confidential information: It’s not ok to publish another person’s personal and confidential information. For example, don’t post someone else’s credit card numbers, Social Security numbers, unlisted phone numbers, and driver’s license numbers. Also, please keep in mind that in most cases, information that is already available elsewhere on the Internet or in public records is not considered to be private or confidential under our policies.

Impersonating others: Please don’t mislead or confuse readers by pretending to be someone else or pretending to represent an organization when you don’t. We’re not saying you can’t publish parody or satire – just avoid content that is likely to mislead readers about your true identity.

Illegal activities: Do not use Blogger to engage in illegal activities or to promote dangerous and illegal activities. For example, don’t author a blog encouraging people to drink and drive. Please also do not use Blogger to sell or promote illegal drugs. Otherwise, we may delete your content. Also, in serious cases such as those involving the abuse of children, we may report you to the appropriate authorities.

Regulated Goods and Services: Do not use Blogger to sell or facilitate the sale of regulated goods and services, such as alcohol, gambling, pharmaceuticals and unapproved supplements, tobacco, fireworks, weapons, or health/medical devices.

Spam: Spam takes several forms in Blogger, all of which can result in deletion of your account or blog. Some examples include creating blogs designed to drive traffic to your site or to move it up in search listings, posting comments on other people’s blogs just to promote your site or product, and scraping existing content from other sources for the primary purpose of generating revenue or other personal gains.

Malware and viruses: Do not create blogs that transmit viruses, cause pop-ups, attempt to install software without the reader’s consent, or otherwise impact readers with malicious code. This is strictly forbidden on Blogger.

Enforcement of Blogger’s Content Policy


Please report suspected policy violations to us using the ‘Report Abuse’ link located at the top of each blog under the ‘More’ dropdown or by clicking here.

Our team reviews user flags for policy violations. If the blog does not violate our policies, we will not take any action against the blog or blog owner. If we find that a blog does violate our content policies, we take one or more of the following actions based on the severity of the violation:

  • Put the blog behind an ‘adult content’ interstitial
  • Put the blog behind an interstitial where only the blog author can access the content
  • Delete the offending content, blog post or blog
  • Disable the author’s access to his/her Blogger account
  • Disable the author’s access to his/her Google account
  • Report the user to law enforcement

We may also take any of the above actions if we find that a user has created multiple blogs engaging in repeated abusive behavior. If you have had a blog disabled, do not create a replacement blog that engages in similar activity.

Add an adult content warning to your Blog

(Turn on the adult content setting)

If your blog contains adult themes or language, you must add a warning page that shows before people can see the content in your blog.

What content needs the adult content warning?

Adult content warning required: pornographic or sexually explicit content.
Adult content warning isn’t required: non-sexual documentary depictions of nudity (like an image of a breastfeeding infant) and depictions of nudity that serve a clear educational, documentary, scientific, or artistic purpose.
If there is any other reason you feel your blog may be shocking or objectionable to some users, you are welcome to activate the content warning at your discretion.
Note: If a blog with adult content is brought to Google’s attention and the content warning is not active, we will turn on the warning interstitial for you. If this happens repeatedly, the blog may be removed.

Add the adult content warning


Open your Blogger account.
Click on the blog you want to change this setting for.
On the left side of the page, click Settings > Other.
Under “Adult content,” click Yes from the drop-down menu.
When the warning is on, a content warning page will warn visitors that some may consider the material on your blog objectionable.

If u Like this information then like us and share this post…THANKS

Add Footer Quote Author Box Widget inr Blogger

I share this  post for blogger users.we just need to add some code in our Widget box,because author box and about uspage is very much important, because All bloggers and visitors love to know about the person behind the blog.Keeping Author Box in blog footer makes your blog professional and Outstanding …

How to add this Widget to Blogger:

  • Go to Blogger > Layout > Add A Gadget > HTML/JAVASCTIPT
  • Paste the following coding in empty box
  • Save arrangement…

.quote_box{width:225px;margin-top:12px;background:#fff url(http://3.bp.blogspot.com/-GhN-_330BUc/T8aVZ-KYOsI/AAAAAAAAAks/4iEphL76zzU/s320/footer+author+quote.PNG) no-repeat 94% 7%;border:1px solid #b6b6b6;position:relative;padding:18px}.quote_box:before{border:15px solid;bottom:-30px;content:”;height:0;right:40px;position:absolute;width:0;border-color:#b6b6b6 transparent transparent #b6b6b6}.quote_box:after{border:14px solid;bottom:-27px;content:”;height:0;position:absolute;right:41px;width:0;border-color:#fff transparent transparent #fff}.quote_content{overflow:hidden}.detail_box{float:left;margin-left:0}.detail_box span{display:block}.detail_box span.name{font-size:17px;line-height:30px}.detail_box span.derole{ color: #666666; font-size: 15px; font-style: italic; line-height: 10px;}.said_box{ font-size: 20px;float:left;margin-top:-130px;margin-left:72px}.said_box span.roleau{ color: #333333; font-size: 16px; font-style: normal; line-height: 20 px;}.custom li.quotes,.custom li.widget.quotes p{margin-bottom:0}

<img alt="YOUR NAME” src=”YOUR 125 X 125 IMAGE URL” style=”border-radius: 777px 777px 777px 777px;” title=”YOUR NAME” />
I’M
HERE
On This Blog


<a href="YOUR GOOGLE + URL” rel=”author” target=”_blank”>YOUR NAME
WRITE YOUR PROFILE DESCRIPTION HERE…<a href="YOUR ABOUT US PAGE URL“rel=”author” target=”_blank”>More


Customization:

  • Change all highlights with your own name,description and URL.
  • That’s all…

Add Touch Me Social Sharing Widget To Blogger

Hi friends i share a post which is calls “Touch Me”. Its named such due to its appealing look that forces a visitor to roll hover the cursor over the icons and hit follow! 🙂 This gadget is neatly structured using buttons from popular services like Google Plus, Facebook, Twitter and RSS.

How to add Touch Me Social Sharing Widget To Blogger

  • Go To Blogger Dashboard > Layout.
  • Click on Add a Gadget
  • Select HTML/JavaScript.
  • Copy and paste below code inside it:

.touchme a { display:block; height:50px; width:50px; padding:0 4px; float:left; background:transparent url(http://beautifulbloggerwidgets.googlecode.com/files/Sharing%20Touch%20Me.png) no-repeat; -webkit-transition: ease-in 0.2s all; -moz-transition: ease-in 0.2s all; -o-transition: ease-in 0.2s all; -ms-transition: ease-in 0.2s all;transition: ease-in 0.2s all; cursor:pointer; } .touchme a.googleplus { background-position: 0px -58px; } .touchme a.googleplus:hover { background-position: 0px 0px; } .touchme a.twitter { background-position: 0px -290px; } .touchme a.twitter:hover { background-position: 0px -232px; } .touchme a.facebook { background-position: 0px -406px; } .touchme a.facebook:hover { background-position: 0px -348px; } .touchme a.rss { background-position: 0px -174px; } .touchme a.rss:hover { background-position: 0px -116px; }

<a class='rss' href="YOUR RSS ID” rel=’external nofollow’ target=’_blank’> <a class='googleplus' href="YOUR GOOGLEID” rel=’nofollow’ target=’_blank’> <a class='facebook' href="YOUR FACEBOOK ID” rel=’nofollow’ target=’_blank’> <a class='twitter' href="YOUR TWITTER ID” rel=’nofollow’ target=’_blank’ >


  • Replace all highlights with your ID…

Thats all!!